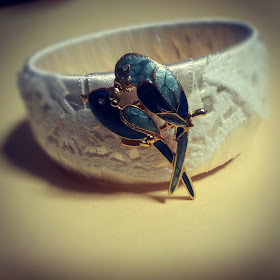
Months ago, I bought a set of neon pink and yellow plastic bangles and a bunch of random brooches from an old couple who ran a little shop in the wet market selling pre-loved items. Most of the time, the wares on sale are truly worse for wear but once in a while, you do find something truly spectacular. I had completely forgotten that I had scored these tacky-but-oh-I-could-use-them-for-something bangles and oh-so-pretty brooches until yesterday.
It all started because my cousins wanted to hang out and since we failed to catch a movie, bake cookies and (insert any random activity you can think of) , we decided to CRAFT!
So after much rummaging and a little inspiration, we produced these:
Aren't they pretty? And they are so easy to make. I made the green one and my super talented cousin D made the white one. I like to point out that I was the one that came up with the idea ( I know I know, I am shameless) and she executed the bangle. And beautifully. Her handiwork is amazing. :)
Step 1. Cut a long strip of ribbon and finish the edges by flickering it over a naked flame to prevent fraying. Next, take your bangle and on the inside, dab a little super glue. Press the ribbon on to the bangle and begin wrapping. Dab a little more glue on the inside of the bangle each time you pull the ribbon over to the front.
Step 2. Once you have finished wrapping your bangle, start arranging your doily over it. We trimmed this one down and cut it into few pieces to fit the bangle. Once satisfied, start gluing them down! Next, paint a light coat of clear nail polish over the doily to make it water proof. This step is important.
Step 3. Almost done. Its really pretty the way it is right now but...


No comments:
Post a Comment