Friday, 10 February 2012

14 Feb: A dish, a date and a gift!

As 14th of Feb looms near, Couples begin to fear, For many fret, And oft break sweat, To give to someone they hold dear. 

 Ah yes, 14th of Feb, better known as Valentine's Day, is much celebrated and also, much afeared, by couples all around the world, fretting over gifts, dates and budget constraints. We decided to put together our top 15 ideas for Valetine's Day. Here are some fun things for inspiration"

 DISHES 1) Chocolate dipped strawberries. They are quick, easy and oh so sexy... Recipe found here


2) Fondue/Both Cheese and Chocolate Nothing is more intimate than dipping meat into hot, steamy cheese or lapping up rivers of chocolate with marshmellows and feeding each other. Recipe found here


3)Chocolate Lava Cake Enough said. Watch how its done


4) Beer Pancakes I know this sounds wrong, oh so wrong but oh so good! Beer enables your pancakes to rise and be deliciously fluffy with a malty, sweet after-taste. This recipe is amazing and I have used it many times. Click here for the recipe.


5) HIS/HER's Favourite Dish This is a cop out, I know, but seriously, this is the best present. It doesn't matter if it sucks, its the thought that counts. :)

6) For those of us who aren't very savvy in the kitchen [This is definitely from E.L.], choose to splurge a little and get a nice jar of cookies! The Grand Hyatt's Mezza9 does these awesome double chocolate cookies that are fudgey-gooey on the inside, which are very popular and not madly expensive.
A jar is currently going for about SGD$28.
Click this link to the original review

7) For those with tight budgets, you can of course craft something for your other half! And what better place to get ideas for this then from us!

I will always remember an advice from one of my guy friends a long time ago, always give a practical gift to a guy because men are not fussed about pretty little things. So do away with that doily-heart buntings, furry teddy bears and frilly little nothings! Make him something useful!

And this makes a great gift unisex gift idea - a daily planner! Make one or buy one! Here is a great tutorial on how to make one


8) However, guys still do like accessories as much as us... 


9) Make a photo collage or decorate a plain photo frame and have your photo in it. Much like the ones we did for our flea here..


Or A wonderful project is to do these photo transfers like this fellow craftster has done. check out her blog here.


10) Another crafting project that is inexpensive, unisex and completely original at the same time is to create your own design T-shirt! Get a plain white T-shirt, some fabric paints and let your creative juices flow! Paint a Pollock onto the T-shirt - the easiest technique and it will turn out looking cool no matter how unskilled you are in painting.

I did one for the B.F. last year [E.L.] - but I used fabric crayons, and I replicated one of his own art works onto the T-shirt. Below is him wearing it!

11) We've also got some suggestions on what you can do together that are affordable and really quite romantic. First up... Rent some romantic comedies and stay in! Go on a rom-com movie marathon, and make-out and neck in the cinema or the couch - just like when you were so young once that you just don't care! ;)

12) Go for a massage together! Be it a big splurge in a spa or even an affordable 40 mins foot reflexology massage will do you both alot of good! You get to spend time together and enjoy the healthy benefits of a good massage. A great place to go that is also affordable is  L.C. Fu Li Hua Foot Reflexology. The masseuse really know where the ache is and will help you with it!


13) Go on a picnic! Pack some lunch and head out to the park! The Botanic Gardens will be a lovely place to lie out on a mat or a lazy stroll through the orchid gardens.

14) Visit a Museum... just do it... any of it! The National Museum, The Singapore Art Museum, The Peranakan Museum, the Asian Civilisation Museum, The ArtScience Museum... And most of the time the entrance fees are really affordable!

15) Get active! Put on your sunblock and flip-flops, and go kayaking! In Singapore, there are quite a few places you can go, and it's cheap! At SGD$15 an hour, both you and your dearest can paddle away into the serenity of open waters... 
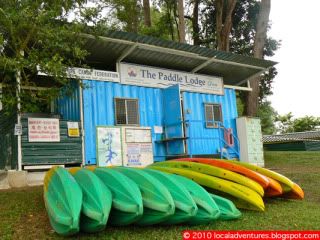
Great! Now you are armed with these invaluable romantic and fun ideas, you have no excuse to not go out there and impress your loved one! If you have more suggestions, put it down in the comment!

And for those singles, don't let the couples have all the fun, do a big group outing with all your friends and exchange gifts as well! Valentine's Day is also known as The International Friendship day after all! [As far as I know anyway.. when I was single, it was what I celebrated with my girlfriends!]

Happy Valentine's Day!

xoxo Cheers xoxo
S.T. & E.L.


Monday, 6 February 2012

S.T: World Nutella Day Feb 5

World Nutella Day is Feb 5, and in sunny SG, I'm late by a day but some people out there in this world on the other side of the are still celebrating it!

Bascially, World Nutella Day is this crazy idea started by two Nutella obsessed girls and the world is better for it! You can read more here: http://www.nutelladay.com/participate/

To be honest, I've been sick today and hence, finally have the time to blog. In honour of this tremendous occasion, I would like to share with you my very own take on Pierre Hermes' Nutella Tart. Created for his wife who loves this confection to no end, this tart is simply divine. I posted about this sometime back but never really gave the recipe.

For my version, I used my very own hazelnut shortcrust recipe modified from my mom's shortcrust and used extremely dark chocolate for the base. I also took liberties and decorated with white ganache.


Its absolutely delicious, its soft and creamy inside, almost like a lava cake and the pastry just melts in your mouth.

Ingredients:


For the crust: 

  • 1/2cup of butter
  • 2 tablespoons icing sugar
  • 1 1/2 cups of plain flour
  • 1/4 cup of self raising flour or ground hazelnuts
  • (With self-raising flour, you get a puffier crust, ground hazelnuts give a slightly heavier but more flavourful crust  )


For the filling:
2/3 cup Nutella
4 3/4 ounces bittersweet chocolate, finely chopped
7 tablespoons, 3 1/2 ounces, unsalted butter
1 large egg at room temperature, stirred with a fork
3 large egg yolks at room temperature, stirred with a fork
2 tablespoons sugar
1 cup hazelnuts toasted, skinned and cut into large pieces (I omitted this and made white chocolate ganache)

For the topping
1/4 cup of cream
1/4 cup of white chocolate

Method: 
Preheat oven to 180 degrees C.

For the crust: 
1. In a large bowl, cream butter and icing sugar. Stir in sifted flour, ground hazelnuts and beat until mixture comes together to form a dough that will be slightly sticky.

2. Spread the dough into the pan and poke holes in it using a fork.

3. Place a baking sheet over the pie shell and fill with baking beads. You can use green/red/soya beans as well.

4.Place in the oven and bake the crust for 20 minutes. Once done, set aside to cool to room temperature. 

P.S This method is called blind baking and for this recipe, you don't want to over bake the crust as it gets baked again with the filling.


For the filling: 

1.Spread the Nutella evenly over the bottom of the cooled crust and set aside.
2.Melt the chocolate and butter in separate bowls over simmering water or in the microwave.  Allow them to cool until they just feel warm to the touch.
3.Use a small whisk to stir the egg into the chocolate, gently and taking care not to agitate the mixture.  You don’t want to beat air into the ganache.  Stir in the egg yolks a little at a time, followed by the sugar.  Stir in the warm butter.  Pour the ganache over the Nutella in the tart shell.  At this point, if you opted for putting  nuts at the top, scatter the nuts now.
4. Bake the tart for 11 minutes.  The center of the tart will still be a little jiggly and the top will be dull, like a cake.  Remove the tart from the oven and slide onto a rack.  Allow the tart to cool for at least 20 minutes or until it reaches room temperature. Please note that baking time varies, on your oven, the depth of your pie tin and size of your pie tin.

For the topping:
1. Place the cream and white chocolate in a metal bowl. 
2. Place the bowl over a pot of simmering water, careful to not let the water touch the bottom. 
3. Gently stir the chocolate and cream mixture till smooth and melted.
4. Drizzle over the top of the Nutella tart.
For the original recipe, click here.

I hope you enjoy this and do let me know if you have any queries! This is best eaten on the day, at room temperature. Left overs( which almost never happen) can be placed in the fridge and warmed up the next day!


X.O.o.X
S.T

This day is proudly brought to you by http://www.nutelladay.com/, http://msadventuresinitaly.com/blog/ and http://bleedingespresso.com/

Pin It

S.T: Quick and Easy Multi-strand pearl bracelet

Hello all,

Its been awhile since I last posted and E.L has been the one doing all the wonderful work, from revamping the look of this site to posting numerous fun posts (despite how crazy busy she is at work!).


So sometime last year, I was in a panic for an accessory to go with a mesh, high neck black evening dress and came up with this really cute multi-strand pearl bracelet.

 Isn't it pretty? And you don't really need much, it took me less than 5 minutes to put it together! 


Step 1. Gather two necklaces of the same length and one long brooch. For this, I used a dusky pink pearl necklace and a creamy white pearl necklace. I bought these from the $2 Japanese shop on a whim! The brooch I selected is a long one, a vintage 80s cat brooch that I bought from a pet shop!


Step 2. Twist both necklaces to make a figure of eight.


Step 3. Bring one end of the figure of eight and stack it on top of the other end, making a coil. Do the same for the other necklace.


Step 4. Stack both coils on top of the other.


Step 5. Unfasten your brooch and place both coils under it.


Step 6. Fasten the brooch to secure everything.


Step 7. Slip your hand through and you are set to purr-fection. 


I hope you found this helpful. I really love this bracelet and have not unfastened it at all. If you find it hard to slip your hand in, try assembling it on your wrist already and get some help fastening your brooch to secure everything.  Try experimenting with different necklaces, strings of beads and brooches. 

Have fun!

O.X.o.X
S.T


Pin It

Monday, 23 January 2012

Support Sewing by Hand

Ok for many of you who don't know my secret... I am going to come right out and declare it here... I only sew by hand! I do not own a sewing machine, the only one we have in the house is broken, and I only rely on thread, needle, and my hands!

Sure it can be tedious to finish up a project that may take only a couple of hours to finish with a machine, but for those of us who are not confident with a machine, sewing by hand can pretty much take you just as far.. Trust me, I sewed my bags and my clothes just with my hands, so I know it is possible.
And I've found it very therapeutic to sew by hand...

So my mom was the one who empowered me with the basics in sewing, like how to thread a needle and make a dead knot etc. But I had to also research on techniques to improve my skills in order to make sure my dresses don't fall apart when I'm walking down the street or something...

So for all beginners and those dabbling with handsewing out there, I support you! I have been told by many that handsewing has no durability and not as good as a machine etc.. but I have you know that I have proven it all wrong.. and I'm here to point you to the right website that has given me invaluable techniques and tips.

Here is the link to the website.

And here is the video I personally use till today with all my projects. Here is the direct link to owners youtube site.

So don't be afraid of learning to sew, there are thousands of sites out there that can help you with it, hopefully I've helped you start!

Cheers,
E.L.

Piedra Negra ~ Great Mexican food

Ever since my cousin brought me to eat at Piedra Negra, I've gone back several times... It's sooo good! Very sinful and unhealthy, considering most of the things I always order are the fried stuff...

But so yummy! Located at the end of Haji Lane, map here.

My cousin's office is at Haji Lane, so she goes to it so often that the chef knows her, and of course he's apparently a real mexican.
Prices range from SGD$10-$20 for food. Alcoholic beverages are also available.

The BF & I went this Saturday, and it was raining badly, so if you've been to Haji Lane, you will know that the shop houses are small and campy, and the restaurant is in one of them, so when we sat on the outside by the road, it got a little wet...


My favourite is the Chile Rolleno, which is basically a stuffed green pepper with cheese and it's coated with bread crumbs and then deep fried. So it's served with jalapeno and tomato-based sauce and black beans, and when you cut into it, the cheese just oozes out... so it's crispy outside and gooey-cheese inside... drool..

Ok the BF's favourite is the Garlic Cod, which I've tasted and it's really good and a much healthier option to the other fried choices on the menu.

So even the BF finds the guacamole they serve with their nachos not too bad, but of course, him being the good Panamanian grandson, he still feels his grandma's better! [well actually I must admit that too.. and nothing beats his gran's salsa]

I love love the colourful decor of the restaurant and the whole mexican theme, it also blends nicely with the rest of Haji Lane's quirky and colourful look - the shop houses in the rain are so whimsical..
Love the mexican tiles accent..


Other great stuff to try on the menu, that I personally love but unable to consume at one time in one meal, are the fish tacos and the flautas.

So even if you are going to be a tourist in Singapore, do come down and check out the place! Great place to just hang out.

Cheers,
E.L.

Good Morning Brekkie! ~ Simply Bread

Firstly, before I forget again.. Happy Chinese New Year! 新年快乐!
I don't celebrate it much anymore, thus the reason for the major posts, been at home vegging out in front of the telly... 

Anyway, I want to share with you a great place that I have been going to with the BF for breakfast! Of course this is based in Singapore for all the international readers out there! So if any of you are planning a visit to our little cosmopolitan island, maybe you can check out these recommendations!

Simply Bread at Guthrie House on Sixth Ave is a lovely place to have a satisfactory wholesome breakfast. Much better option than MacDonalds... click here for the map.

It's also a bakery that bakes all these yummy wholewheat breads and sweet baked goodies, and it's always freshly out of the ovens in the morning. Usually by late afternoon they'll be running low on the breads as everyone in the neighbourhood probably pops by every morning and leaves with a loaf under their arms. It's also a very family-oriented place, weekend mornings will have the place packed with parents and their kids.

The breakfast they serve are all fresh too, using their own breads and all cooked fresh, none of the pre-heat stuff that fast food places have.

They also serve lunch, which are usually the selections of sandwiches, but I think they have sandwich specials everyday too.

The cinnamon roll isn't bad... I love love cinnamon rolll... very hard to find in Singapore these days.. 


The menu.. click to enlarge and see it clearer..


I usually get the eggs.. you can add things to it.. this was an omelet with shitake mushrooms... and roast peppers draped on top because they forgot it and served it on the side for me instead.. hahaha

So if you ever do get up early on a weekend morning and looking for a pretty good fresh brekkie, head down to Simply Bread! 

Cheers,
E.L.

Beach Kaftan DIY ~ E.L.

On a recent company retreat to Phuket, my colleagues and I went a little ga-ga over the beach kaftans. So I bought a couple for myself and a couple for friends too.

So below is one that I got for me, and of course, a beach kaftan is usually worn over your bikini on a beach, but I think it works too as a summery outfit!

Wear it over a tank top and shorts, and I feel the green paisley patterns on it looks great with brown and bronzey accents. Wore it with my Topshop strappy gold-bronze sandals, with my brown purse the BF bought for me from Target [hey fashion can be affordable too!], and brown skinny braided belt to pull in at the waist.


Ok so I may have bought this kaftan, but it's actually really easy for you to make one yourself, especially if you're not visiting Phuket anytime soon to get one of your own...

I did up a tutorial on how to make it, I haven't tried it personally, but I'm pretty sure this is how it was made anyway.


First Step: Start with 2 scarves with the same pattern and measurements.
The measurements below are just an estimated one.

Technically, the width should be able to stretch from your shoulder to your wrist to make the sleeves. And the length should be how long you want the kaftan to be, so 56 inches should stretch over your shoulders to reach slightly below your waist on the front and over your bum on the back.

So take note of these measurements if you are going to cut out from your own cloths instead of using ready-made scarves.


Step 2: Sew on buttons on one scarf with the loop holes on the other, this is the part that keeps the kaftan together.

And as seen below in the diagram, there should be enough space between the 2 sets of buttons, the space should be left unsewn so your head goes through it.

Step 3: So when it is done, put it over your head, and there will be the buttons down your front and back.
So hope this works if any of you try it out!

Cheers,
E.L.
Pin It