This is a fun piece as you can use your favourite cloth prints to create your own bag, I've picked out this fairy-tale-goth-like cloths in 2 different colours and a Japanese flowers print for my bag


For this simple shoulder bag, you will need:
2 Patterned cloths - 1m each [this is an estimate with extras in case of mistakes]
Interface lining 1m - I used felt as it is thicker and firmer so it gives the bag more shape
A big button [optional]

So here is Step 1:
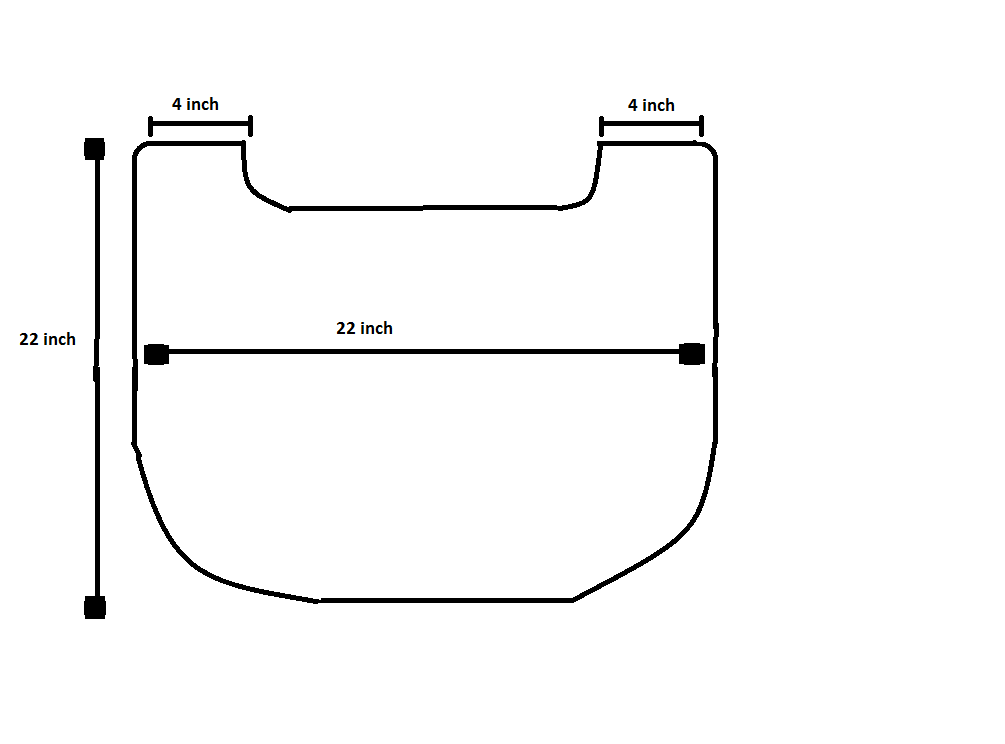
Cut out the following pattern, my drawing is not drawn to scale so just use the measurements and chalk it out on your 2 patterned cloths and felt interface - make 2 pieces for each cloth and felt. I usually overestimate my measurements so that I leave enough allowances for seams when I sew them together.

Step 2:

Step 3:
The strap I made is slightly more complicated, where I used the all the different patterned cloths, but this is the simplified version where we use only the outer patterned cloth to make the strap.
Also I did a piping on the inside of the carrying part of bag to hide the stitching, by using scrap pieces of cloth and overlay the seams and used invisible stitching to hide them. But for beginners you can just leave it, I'm just a little too detailed for my own good.

Step 4:
So here, when you have all the pieces sewn together, you can leave it as it is at the end of step 3, or for aesthetic purposes like mine, I pleated in the middle part and added a button. I also made a rubber band type of attachment on the opposing side of the button, so that I can use the rubber band strap to sling it over the button as a way to 'close' the bag.
Use a nice big button to make it look cuter! I used an old vintage button I found in my mother's collection :)

So ta-da! you have a shoulder bag! This tutorial can be really versatile too, if you want it bigger or smaller, you can just adjust the measurements accordingly.
If you're going to try it out, feel free to ask me questions if you're not clear and I'll do my best to help! Show us your final piece if you tried out this tutorial!

Cheers, E.L.
Pin It
Thats got to be the nicest easiest bag Ive seen ! Good one!!!
ReplyDeleteThank you!
DeleteReally nice! Will have a go, thanks x
ReplyDeleteThank you! And have fun with it!
DeleteLove this pattern. Such a cute bag
ReplyDeletethank you! Give it a try if you have a chance!
DeleteI tried this out! I modified a little bit making it an over the shoulder type bag. I'm a beginner so it turned out pretty good for me! I'm trying to post a picture, but cannot figure it out :(
ReplyDeleteAww! ok email it to us! stel.blog@gmail.com
Deletehi,were did you get this type of fabric from-its amazing <3
ReplyDeleteHi, I got it from Chinatown in Singapore, it was imported from Japan. But if you're not based in Singapore, I'm sure you can find pretty cool fabric prints even in your own Chinatown! :)
DeleteE.L., found this gorgeous bag on Pinterest. I'm trying it myself today. Thanks for the inspiration.
ReplyDeleteWhat is 1m? Is that like 1 yard? Sorry I just want to make sure before I go out and get what I need! LOVE the pattern!
ReplyDeleteYou have a great artist in yourself. You have made a really stylish designer handbag. Thank you for sharing a very valuable information to us. I will definitely to create for me as i'm not much creative I know it will not look as cool as you had created. I'll sure update this kind of stuff in my collection soon so you can even earn money for your creativity. Check this website www.gkfashionstore.com for collection of dresses, footwear and handbags products for womens.
ReplyDelete